We are happy to publish an updated Prestashop inventory module to synchronize products and orders between Erply and Prestashop (version 1.5.3.1). As the module is still in beta, please contact us at integrations@erply.com
and we'll give you the access and setup instructions. This module allows two-way synchronization of categories, products and customer groups. Also one way (from Prestashop to Erply) synchronization of customers, customer addresses, orders and order history. This guide details the setup and use of the Erply module.
and we'll give you the access and setup instructions. This module allows two-way synchronization of categories, products and customer groups. Also one way (from Prestashop to Erply) synchronization of customers, customer addresses, orders and order history. This guide details the setup and use of the Erply module.
1. Erply - Prestashop Inventory Connector setup
To start using the module, follow the steps listed below: [caption id="attachment_1378" align="alignleft" width="1036"]
1.1. Erply module installation
Copy the Erply module to the Prestashop 'Modules' folder. Log in to Prestashop administration panel and go to the 'Modules' page. [caption id="attachment_1384" align="alignleft" width="1000"]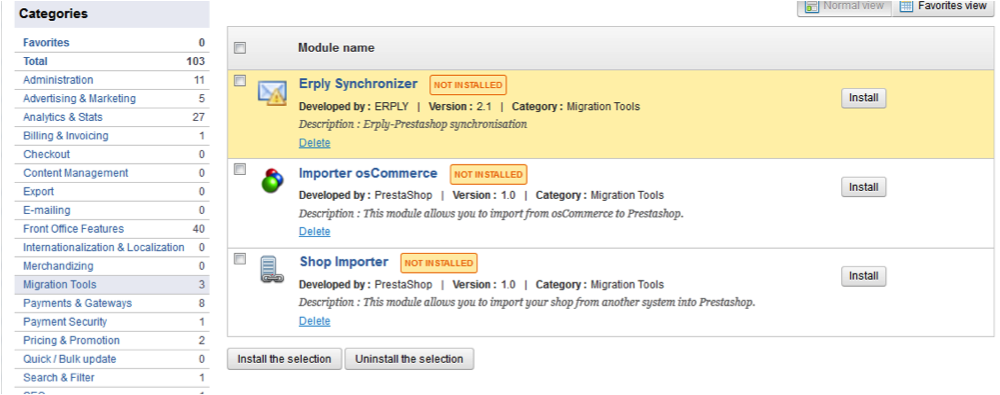
Prestashop Install Categories[/caption] Choose Migration Tools module category from categories list.

Click the Erply Synchronizer “Install” button, a „successful installation“ message appears on the Erply Synchronizer module.
1.2. Erply module setup
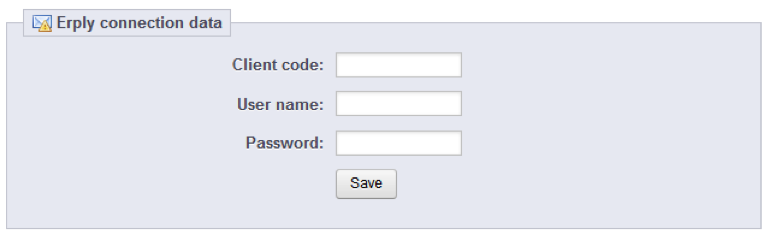
Click „Configure“ on Erply Synchronizer module. [caption id="attachment_1383" align="alignleft" width="768"]
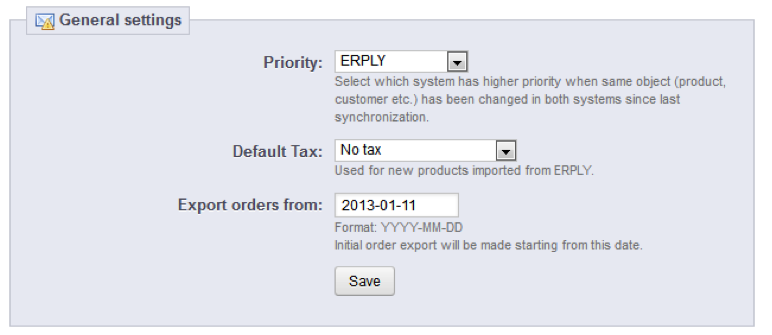
Prestashop Webstore Config[/caption] On the module page type in your Erply user credentials and save them using the “Save” button. [caption id="attachment_1382" align="alignleft" width="772"]
Prestashop Webstore Inventory[/caption] Before synchronizing the products some settings can be made and saved.
Priority
- Select which system has higher priority when the same object (product, customer etc.) has been changed in both systems since the last synchronization.
Default Tax
– If tax value is not found in product data this value is used.
Export orders from
- Initial order export will be made starting from this date. [caption id="attachment_1381" align="alignleft" width="772"]
Prestashop Inventory[/caption] To begin the synchronization choose the synchronization direction (from Presta to ERPLY, from ERPLY to Presta or both ways) and click the 'Start' button. After the initial synchronization use the ‘Start’ button if you wish to update existing data. Keep in mind that Erply allows 500 API requests in an hour. If that number is exceeded, an error message will show. In this case, return to the module page, wait for an hour and try to continue the synchronization by clicking the ‘Start’ button.
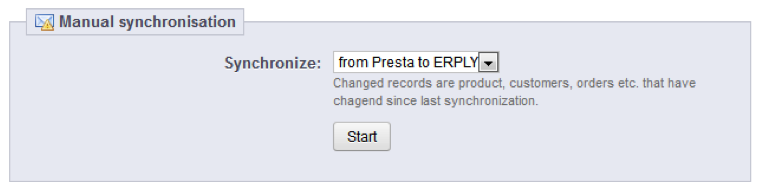
To enable automatic synchronization cron_all.php from module folder should be added to server’s crontab.
1.3. Erply module synchronization details
This module performs a two-way synchronization of the Erply – Prestashop product categories, Erply – Prestashop customer groups and Erply - Prestashop product, so all Erply products and customers appear in Prestashop and all Prestashop products and customers appear in Erply. In case of Erply -> Prestashop synchronization the fields are mapped as:1.3.1. Category/product group synchronization
|
Erply |
PrestaShop |
| parentGroupID | id_parent |
| name | Name |
| showInWebshop | Active |
1.3.2. Product synchronisation
|
Erply |
PrestaShop |
| displayedInWebshop | Active |
| name | Name |
| added | reduction_from |
| added | reduction_from |
| code | Reference |
| code2 | ean13 |
| description | description_short |
| longdesc | Description |
| groupID | id_category |
| groupID | id_category_default |
| vatrate | id_tax_rules_group (local id is matched by vatrate value) |
| vatrate | id_tax (local id is matched by vatrate value) |
| price | Price |
| netWeight | Weight |
| brandName | id_manufacturer (New manufacturer is added if not found) |
| supplierName | id_supplier (New supplier is added if missing) |
| supplierName | supplier_name |
| warehouses (sum of “free” field for all warehouses) | Quantity is added to product |
| images | Images are added to product |
1.3.3. Customer groups synchronization
|
Erply |
PrestaShop |
| Name | Name |
1.3.4. Customers synchronization
|
Erply |
PrestaShop |
| firstName | Firstname |
| lastName | Lastname |
| birthday | Birthday |
1.3.5. Customer address synchronisation
|
Erply |
PrestaShop |
| typeID | id from Erply API getAddressTypes response |
| street | address1, address2 |
| city | city |
| postalCode | postcode |
| country | country |
1.3.6. Orders synchronization
|
Erply |
PrestaShop |
| id | Order id if the order is synced before, null otherwise |
| type | “INVWAYBILL” is sent by default |
| currencyCode | iso_code |
| date | date_add |
| time | date_add |
| customerID | Customer id if the customer is synced before, null otherwise |
| payerID | Customer id if the customer is synced before, null otherwise |
| addressID | Address id if the address is synced before, null otherwise |
| payerAddressID | Address id if the address is synced before, null otherwise |
| internalNotes | Prestashop Invoice Number: “invoice_number” |
| #productID | Product id if product is synced before, null otherwise |
| #itemName | product_name |
| #vatrateID | tax_rate |
| #amount | product_quantity |
| #price | product_price |
| #discount | discount |
1.3.7. Order history synchronization
All updated orders are synchronized with Erply. If the order is deleted from Prestashop it is deleted from Erply also. If the order is paid invoiceState is updated to “READY” with saveSalesDocument update method. If the order is paid new payment is synced to Erply with field mapping:|
Erply |
PrestaShop |
| customerID | clientID from Erply API getSalesDocuments response |
| documentID | “READY” or “PENDING” depending on the status |
| date | date_add |
| sum | Total from Erply API getSalesDocuments response |
| currencyCode | currencyCode from Erply API getSalesDocuments response |